Showing posts with label mercury glass. Show all posts

Monday, April 1, 2013

Past Their Prime to Pot Whimsy

{reduce, reuse, recycle, reclaim, repurpose, respect}

This week, I'm continuing to focus on cleaning out the potting shed and repurposing garden items that have seen better days.

Let me just say, my potting shed looks nothing like this incredible space. Oh, the envy!


But, I do want to share some ideas on repurposing and recycling your terra cotta and ceramic pots. Stained pots. Broken pots. Idle pots. 

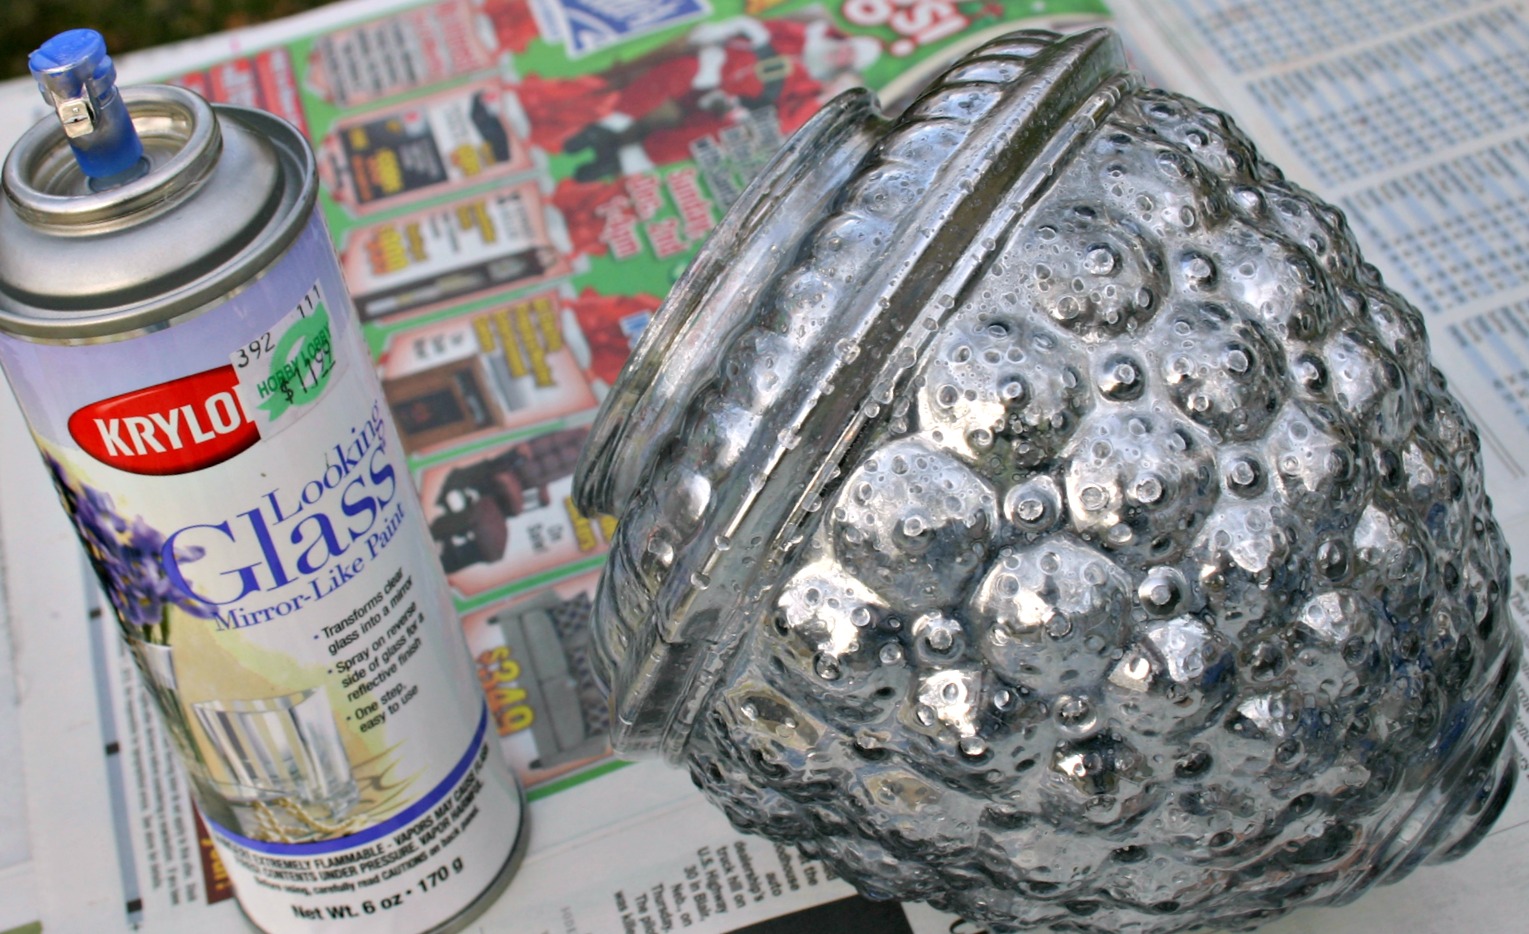
Last fall, before the extended cold set in, I pulled a small- to medium-sized pot out of my potting shed for use in a holiday center piece. It was mossy, with white and yellow stains. It had a crack in it and a chip out of the lip. 


I cleaned it off with a wire brush, but didn't worry about getting it perfectly clean. I wanted it to have a rough finish to go with a mercury glass globe I planned to add to the top. I transformed the pot with a mixture of gesso and a paint sample with the name of  "Marble Glass."


You can see how I made the faux mercury glass tree here.


Crafty uses for terra cotta pots have been around a long time. "Pot people," windchimes, garden fountains and birdbaths are among the more common projects and can be found in abundance on Pinterest, if you're interested.

I set out to find a few more unique uses for old pots and found a few that I really liked.

The Sage Butterfly's post about using broken pots in the garden is one of my favorites.  In addition to using pieces of broken pots to cover the holes in the pots she still plants in, she uses broken ceramic and terra cotta pots in a unique way in the garden. I love what she's done with some of her pieces.


I hope you'll visit The Sage Butterfly to see more of her lovely buried treasure. I'm going to try her technique on this large pot. The rim broke off a couple of years ago and it's been sitting in a corner in my potting shed since. Time to put it to good use.


I have plans for both the bottom and the rim.

My son is interested in unique lighting created from repurposed parts, so lighting projects tend to catch my eye. Apartment Therapy offers a tutorial for making pendant lamps from terra cotta pots.


I think these would be especially charming made from used pots that have some garden stain and moss charm attached.

Once Wed's DIY Wedding Cupcake Stand is adorable and could be used for any occasion. In fact, it could be used to display jewelry or other small items, too. You will find the how-to for this pot project here.

Rosemary at Villabarnes is a master at repurposing all sorts of wonderful finds. I loved this pot she designed and pinned it when she first posted it. Such a lovely use of a pot. With Rosemary's treatment, you don't have to worry if your pot has nicks, chips or cracks. They'd simply add character. 


As you sort through your gardening items this spring, don't be too quick to toss old pots that might not be in perfect condition. 

Maybe you saw a pot project or two here that you might be inclined to try? Do you have your own recycled pot projects to share? Leave a comment and a link to your earth-friendly makeover or idea.


Make it a great day!
Linking to:

Thursday, December 20, 2012

A Simple Splash of Red


When I visit the wonderful blogs on my reading list, I find the all-shades-of-white, light-neutral and shabby chic vignettes and decor are what most often catch my eye and draw me in first. They're so luscious,  soft and romantic.

Funny that the soft whites impact me that way because I love color. Our home, while dressed in knotty pine throughout, bears color on all the (non-knotty-pined) walls and the original vintage tile floor on the lower level.  Some of that color is big and bold. Additionally, most of our accents and decor are colorful, and I don't mean colorful as in a single color family. I guess it's my passion for all things vintage that heavily influences a color palette with a wide variety of hues. 

This Christmas season, for the first time ever, I "neutralized" much of the holiday decor in the living room. Not quite able to let go of all color, I added small splashes of red amongst the winter whites, silver, gold and mercury glass. Like my great-grandmother's tiny antique bottle brush Santa.


And an antique German liquor bottle in the shape of a Santa.


A couple of well-placed pretty red items alongside the feather trees adds interest. In my humble opinion.


And, the tall, ceramic pencil Santa my mother hand-painted for me adds subdued, but stately, color against a collection of vintage mirrors.


A simple vintage ornament with a red band creates some pop next to the large mercury glass bowl on the Stickley postal table.


Relax! It's not a bonfire in my living room. But, I wanted to share a night shot of the mercury glass bowl on the postal table. I filled it with twinkle lights and this is what it looks like with the lights on. Sort of. You'll just have to take my word for it that it's softer light than that in person.


For a final splash of red, I included this stunning male cardinal I photographed this morning in the cedar tree along the ravine at the back of our yard. This was our first significant snow of the season. Fitting as a prelude to winter, don't you think?

Although I used a long lens to capture him, this brilliant guy was quite a distance away. So, I hope you'll pardon the photo quality.


I'm dedicating this post to my mother, who was born in December and passed in December six years ago. She was an avid, amateur birdwatcher, who counted the cardinal among her favorites.

Make it a great day!


Monday, December 3, 2012

Faux la, la, la, la


Oscar Wilde said, "Consistency is the last refuge of the unimaginative."

One thing I can't be accused of is decorating for Christmas the same way year after year. I don't always throw the baby out with the bath water, but I do change things up and add some unexpected delights to the vignettes I carry over from a previous year.

This year, I wanted a different centerpiece for the dining room table. I had picked up a clear glass globe at a thrift store for 99 cents last summer. Unfortunately, I didn't remember to photograph it before I started its transformation to a faux mercury glass tree.


The weather was so incredible this weekend that I set up shop outdoors and worked on my tree creation and a few other projects I'd had sitting around. 62 degrees in Nebraska in December isn't unheard of, but it's a bit uncommon.


In contrast to the high gloss of the mercury glass, I wanted the base of the tree to be rougher. I poked around the potting shed and found a terra cotta pot that was the perfect size. Cleaned it off with a wire brush and transformed it with a mixture of gesso and a paint sample with the name of  "Marble Glass."


I wanted the pot to look rustic and distressed, as a contrast to the sparkle of the globe, so I dry brushed the creamy paint mixture.  The pot also has a couple of chips and a crack in the rim. I think they call that character.

A flameless votive inside the pot adds a soft glow to the globe.


One of my milk glass cake stands on top of a vintage oval mirror, several small mercury glass ornaments, a few glitter stars and some acrylic ice crystals round out the centerpiece.


The sparkle and shine in the center of the dining room table is a nice complement to the arrangement on top of the buffet--one of those vignettes for which I retained a few elements from the previous year. I'll share that with you later.

Have you tried making your own mercury glass? Isn't it fun?

Make it a great day!
Linking to:


Thursday, December 15, 2011

A Faux Mess--Maury to the Rescue

Am I the only person who didn't know not to wash faux mercury glass? And, I don't mean put it in the dishwasher. I mean wash it by hand in dish detergent.

Trying to put a super sparkle on my store-bought mercury glass votives recently sent me into a panic and made my husband feel really bad. I set all my pieces out to clean them up and he offered to wash them for me. An offer I gladly accepted because he's nothing if not thorough. When he was nearly done washing all of them, he realized there were chunks of silver floating among the detergent bubbles. Pretty to look at, but not good.


As you can see, not all of the faux mercury washed away--just the majority of it. I quickly regained enough composure to turn my focus from what could have been a total loss to what I hoped would be a solution.

I remembered Maury at Life on Mars had shared a tutorial on creating your own faux mercury glass. I had always intended to try it--on a piece of my choosing, not on a reclamation project. But, what the heck, this could save me from my own stupidity.

Maury's tutorial is excellent. I wrapped the outsides of my votive glasses in wide masking tape and sprayed and spritzed away.

I gave each glass two light coats of Krylon Looking Glass paint, which, when combined with the scraps of mercury that remained on each one, created a nice layered look. Once the glass votives were incorporated into the rest of the holiday decor and the tea lights lit, no one would be the wiser.


Uh . . . except that I just confessed to the world.

Make it a great day!