Wednesday, October 26, 2011

Obsessed with Amber


A girl can never have too much amber. This girl can't anyway.

So, for a flourish of fall around the house, I pulled out nearly every piece of amber glassware I own. And the amber-colored vintage jewelry, amber-beaded tassels and garland and amber-toned ornaments. Then, I threw together a dining room decor full of warm fall color and sparkle. 

To add polish and cohesiveness, I called into service my vintage beveled mirrors and, finally, sprinkled the room generously with satin fabric pumpkins and turkey feathers. A simple recipe for an autumn feel.


Front and center on the buffet, I stacked vintage cake stands and topped them with an upside-down small amber bowl that forms a pedestal for a larger right-side-up carnival glass bowl. I embellished the centerpiece with vintage brooches, beaded tassels, garland and satin pumpkins. Can't you almost smell apples and cinnamon, pumpkin spice, caramel and perhaps a hint of dried leaves?


What a nice warm glow . . . a vintage Fostoria juice glass forms the pedestal for a pretty pumpkin.


The vintage mirrors add special sparkle and interest under the room's arrangements. Love the etched detail on this mirror.


Flanking either side of the buffet's cake stand tower are arrangements of amber-colored goblets, more satin pumpkins and beautiful iridescent feathers courtesy of our flock of backyard wild turkeys.


On the dining room window seat, which catches the southern sun, I positioned a beautiful amber-colored, mirrored-glass mosaic bowl on top of another amber cake stand and filled the bowl with small pumpkins and gourds. The mosaic mirror glass dances in the sunlight, throwing bits of light around the room, changing character and intensity as the day goes on. The cake stand is embellished with amber-beaded garland and positioned on another vintage mirror with beautiful etching.


A large satin pumpkin atop an art glass cake stand adorns the dining room table. Amber-colored fabric-and-bead ornaments on an oval vintage mirror round out the centerpiece.

And, finally, I wrapped the chandelier in evergreen and strung it with an amber prism garland to round out this sensuous fall decor.

But wait! There's more! When you look now, you'll get amber vignettes in the foyer and amber tableware in the kitchen awaiting Sunday guests.

Don't worry--I won't bore you with the rest of it. Not today, anyway.


Make it a great day!

Friday, October 21, 2011

Fall Swap All Buttoned Up


Recently, when I was surfing through blogland, I was excited to find a charming blog called Button Floozies. Its host, Laurie, has engaged a group of button-loving, talented bloggers who each contribute a blog post about once a month--a creative approach that affords a wonderful variety of writing styles and all-things-button topics.

Laurie had just issued a call for participants in a fall-themed button swap when I found her blog. A chance to swap buttons with other bloggers? I was so in!

After amassing a list of participants, Laurie randomly paired us up. The swap involved decorating an Altoid tin, filling it with buttons that have a fall flair and sending it to our assigned partner.

This was such a fun project--from noodling my tin design, to figuring out how to execute it (a bit intimidating for a first-time tin decorator, but definitely exciting), selecting the buttons to include in the tin and corresponding with my partner.


I covered my box with cardstock in colors that blend with fall decorating, but could be used for year-round display, if desired. The edges are finished with complementary ribbon that I aged with distress ink.


The inside of the box is covered in a coordinating cardstock and complementary ribbon. To create interest on the top of the box and inside the lid, I selected two elegant Victorian scissors images from The Graphics Fairy, printed them on coordinating paper that I aged with distress ink and mounted them on a different complementary ribbon.


A selection of vintage mother-of-pearl buttons in fall-ish colors was the finishing touch to the outside of the box.


I filled the box to the brim with fall-themed and colored buttons and sent them off to my swap partner, Laura.

And, when Laura's package arrived in my mailbox, I ripped into it like a kid at Christmas. Her tin was exquisite and the buttons were marvelous. I'm including photos of her project so you can enjoy it, too. Thank you, Laura, for the perfect swap.


I absolutely love the crackle paint on the back and sides. And the wooden tile and copper embellishments are such wonderful elements.

I'd never decorated a tin before, but had so much fun with it that I know this won't be the last tin I embellish. In fact, I'm anxiously awaiting the next Button Floozies swap. (Please.)

See other swap participants' projects here.

Make it a great day!

Thursday, October 13, 2011

Give the Guy an Apron

What do you give a tool-toting, spatula-wielding 24-year-old graduate student?  Why, an apron, of course. A dude apron.


When home from college for a short visit, our son, Sam, who likes to cook, said he needed an apron. Duly noted as a potential birthday surprise. Something I could have fun making for him.

Because he also likes to repurpose vintage furniture and other findings, I chose a style that would serve him equally well for both cooking and his creative projects.

I have a favorite full-front, mid-length apron that has the big handyman pockets across the bottom. It's good for gardening, projects and cooking. Perfect as a pattern. And, I selected some fun graphics from The Graphics Fairy to add to make it unique for him.

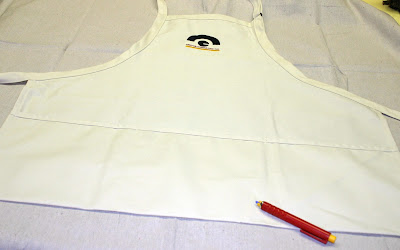
For my son's apron, I selected a medium-weight canvas painter's drop cloth, laid my premade apron out and traced around it with marking chalk, adding enough length to the bottom to fold up to make the pockets.


I folded up the bottom and stitched where I wanted the pockets to be. Then, I hemmed the sides. Because I hate making skinny ties that have to be turned (and I'm basically lazy), I used one-inch black twill tape to finish the edges of the upper portion and to create the waist tie and loop for the neck--all one piece. The basic apron's done. So easy!

Now for the fun part--adding the graphic images. Sam is a big fan of steampunk--as am I. He also loves riding his bike to campus every day. I found some wonderful early bicycle images in the steampunk category of Karen's great graphics blog and printed them on a vintage flour sack.

Using fabric fusing, I attached the images to the apron and trimmed with quarter-inch black twill tape that matches the tie twill.


There. Quick, easy and personal.


Got ya covered, Buddy.

Make it a great day!


Sunday, October 9, 2011

Jump on the Subway Trend

Ever need that a special piece to anchor a mantle vignette, a little something to add spice to a bookshelf or a final piece for the wall arrangement puzzle? Consider subway art.

Call me Rip Van Winkle, but I only recently awakened to this visually impactful typography art form. Thank you Pinterest. After months of looking past all types of word art, this piece from Mary at Very Merry Vintage Style caught my eye and now I'm hooked.


I have so much on my plate right now that I have been avoiding creating something for myself. So, when I got a wedding invitation, the light bulb went on:  I could now create some nice subway art and wouldn't have to feel guilty about putting other things aside just for my own amusement.

The young couple needed art for their small apartment, so I decided to go with sort of a seasonal collection. I picked a nice fall piece they could hang now, a holiday piece they could replace it with and a third piece for the remainder of the year. Here's a peek at the fall art:
 

I found each of the subway art pieces as a free printable online. Bless the talented artists who can create these beauties and who are willing to share with others. Their creations and generosity are truly appreciated.

Using my inkjet printer, I printed the images on craft muslin and put them in three different, but coordinating frames. And, let me tell you, timing is everything, as I found the frames at Michael's for 50 percent off and had a coupon for an additional 25 percent off. Few things are more exciting than stumbling into that kind of bargain.


Here's the first in my trio of creations. Andy at Poppies at Play created this beautiful subway art for fall. I love the crow silhouette in the background.


Now, for the second piece. I love this frame, which is perfect for the horizontal goodness of this nice word art. You'll find this and its coordinating printable holiday banner art at eighteen25. Thanks for letting me grab it, gals.

To round out the trio, I looked for summer subway art. I found a few nice images, but then I came across the perfect art for the bride and groom. Both are members of the Army National Guard.


I like the way this turned out. This special piece pays tribute to the sacrifice the bride and groom make for all of us. This summer, both were deployed for several weeks to assist with flood control along the Missouri River and returned home only a couple of weeks before their wedding.

And, the sentiment of the third piece is timeless. They can put it up just for summer or leave it up year-round. I want to thank Blooming Homestead for this heartfelt printable.

After venturing into the world of subway art, I researched tutorials for making the art myself. And, while that wasn't a good option for me in the short time I had to produce my trio of framed sentiments for the wedding, I do think I'll try my hand at it sometime in the future.

I'm sure there are many good tutorials out in blogland, but I found a couple that seem to be all you need to get started making your own word art.


Kate at Centsational Girl gives a thorough step-by-step that even I understand. She made the cute art above using the method she describes. See her tutorial here. 


Now, to get a closer look at this entirely different method for word art, check out Wendy's how-to for creating stunning images on wood, canvas or other surfaces at The Shabby Nest. Her white-on-black treatment creates a big wow factor. What an impactful creation.

I'm thrilled to have discovered the creative possibilities word art provides. Up next? I'm going to do something for me. I have just the perfect thrift store frame and the perfect spot to hang Mary's pretty, printable Paris poster.


Make it a great day!


Monday, October 3, 2011

Give a Hoot

Our daughter recently moved to a cute little Victorian-era rental. The night before we headed to Kansas to deliver the cedar chest we'd been storing for her, I remembered a 50-cent garage sale find I had squirreled away to give her at a later date.


She collects owls, but I couldn't give this to her as it was--basically cute, but just too boring (I could see why it ended up on a garage sale). So I whipped out my paints, whipped up a mixture of pomegranate with a touch of charcoal and gave it a base coat. After it dried, I wiped on a layer of parchment paint and removed the excess with an old t-shirt. I let it dry overnight.

In the morning, before loading the car, I glued a couple of nice twigs from our bur oak tree on the front and back. Now, the sweet little bird looks like he's perched on a branch. Originally, Hooty was intended as a napkin holder. Molly is using him for her mail.


Fun little house-warming gift, don't you think?

Make it a great day!

Linking to:

Sunday, October 2, 2011

There's Nothing Like a Good (Old) Book

We're a family of readers and book lovers. Nearly every room in the house has built-in or freestanding bookshelves. Our lower-level library shelves cover two walls, floor to ceiling.


Yep. Our collection is extensive. Classics. Contemporary. Poetry. Prose. Fiction. Non-fiction. Mysteries. Sci-fi. Fairy tales. Tall tales. Children's stories. Vintage readers. Humorous. Not-so-humorous. Reference. And, yada, yada, yada.

Hidden away in my craft room is another collection of wonderful books. Here are the books that most people would reject because they are beat up, torn up, colored on and in and generally destined for the trash heap.

I love those books! I extend their lives and usefulness through my craft projects. I scan their wonderful illustrations, decoupage their pretty pages and preserve their prose as handmade envelopes.

This weekend I picked up a great collection of vintage books in fair condition at a local estate sale. I got the entire bunch for a song. All were published between 1917 and 1921, so I'll certainly be scanning some images for projects. Over the next few weeks, I plan to share some with Karen at The Graphics Fairy so that all of you can use them in your projects, too.

Take a look at these beauties!


This nice bird book was published in 1929, too late to share images from, so it will take a place of honor on the Bird Shelf, next to a nice collection of other avian-related books, both new and vintage.


Make it a great day!